- Nice introductory examples of basic data exploration actions with GIFs and key bindings
Excerpts from Python is Not Always Needed — Quick Exploratory Analysis with VisiData by Jacob Ferus:
ITNEXT
Data Science

Image generated by Jacob Ferus
Data scientists typically have an arsenal of frameworks tailored for data cleaning and manipulation in their preferred programming language. Yet, there are times when we just want to quickly glance at the rows of the dataset, perform a few simple filtering operations or calculations, and then be done with it.
Booting up a Jupyter Notebook, creating a new notebook, importing the packages, etc. It doesn’t just take up time, but also some simple tasks, such as scrolling through the data frame, are not that seamless in this environment.
Wouldn’t it be nice with something light and convenient for these use cases?
Enter VisiData: an efficient terminal-based data science tool for swift exploratory analysis of datasets. Now, I know that some of you will almost shiver at the thought of conducting data science at the terminal, but don’t fret, VisiData is easy to get started with and a user-friendly tool; for certain operations, it even executes Python expressions! Let me show you.
Getting started with VisiData
To get going with VisiData, we first have to install it with pip:
pip install visidataThereafter, it’s as easy as running:
vd some_data.csvto start the program. Besides CSV files, it also works for JSON, Excel files, and even databases, among other forms of data.
After starting it, a view like the following will be shown:
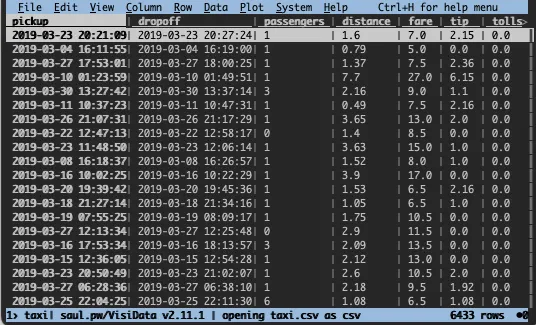
In this case, and for the rest of the examples, I’m using taxi data that can be found here.
Functionality
Navigation
The first thing you can do is simply navigate around the data using the arrow keys. You can also scroll or click on a row with the mouse. If you need to quickly review whether the file looks okay, this may be enough at times.
Sorting
Let’s imagine there was an unexpectedly high tip that you would like to investigate. To find the row, we need to sort the data frame on the tip column. This is easily done in two steps with VisiData. First, we need to cast the column to the correct type. By default, all columns are considered to be text. To change type, select the appropriate column (with left/right keys) and press:
#for integer type%for float type$for currency type@for date type~for text type
In this instance, we have a floating point column, hence we use %. Next, we use the ] key to sort in descending order ([ sorts in ascending order).
Now, let’s get a better view of that row. To do this we press enter while selecting the top row. This will construct a new so-called sheet with only that row. To close the sheet, press q.
The distance is set to zero for this ride, but this is the case for many other rows as well. Note that the initial screen is also a sheet and can likewise be closed down by pressing q.
Filtering
You’ve previously heard that something strange was happening for trips with more than two passengers and for trips of longer distances. You decided to have a look. To do this we need to narrow down the data frame to those rows.
Before that, we can undo the sorting with shift + U. Next, we need to, like before, cast relevant columns to the correct types. In this case, the column passengers is of integer type (#) and the column distance of float type (%). Let’s convert them:
Thereafter, we can select a number of rows using z| followed by a Python-like expression. In the GIF below, you can see what is typed at the bottom of the screen. Here’s what is occurring:
- I type
z|and a Python expression:passengers > 2 and distance > 5 - I press enter
- Now rows that fulfill the condition are marked with yellow (a few are shown as I scroll down)
- To remove all but the yellow rows, press
"
Performing calculations
What’s the fare cost per distance? To find this out, we need to divide the fare column by the distance column. As we saw earlier, some rows have a distance of zero, thus, we first have to filter for rows with a distance greater than zero and then perform the calculation. Additionally, the fare needs to be cast to type float (%).
The filtering works the same way as was done in the previous example, i.e. z| followed by an expression, enter, and ". The new expression is calculated by typing = followed by an expression. Here, this expression is fare / distance. After pressing enter, a new column will appear with the name equal to the calculated expression.
Summarizing
To summarize the data frame and our new column, we first cast it to floating point type with % and then press Shift + I. This will pop up a new sheet with a number of aggregated values calculated for each column. If a column is not fully visible, you can type _ when it is selected to improve the visibility:
Plotting
The final thing I would like to show you is how you can plot data in VisiData. I will show two ways. The first way is to plot two columns against each other. This can be done by marking one row as the x-axis with ! and then pressing . at another row that will become the y-axis, (here distance vs. fare):

The second way is to display a histogram. For a continuous column, this first requires a calculation to put the data into buckets and then show the frequency of those buckets. Here’s the method I used:
- I calculate a new “bucketed” column, by typing
=followed by the expressionround(distance / 0.2) * 0.2. This will put the distances into buckets of size 0.2. - I cast the resulting column into float (
%). - I then press, while the column is focused,
Shift + F. This will open up a view showing counts, percentages, and a histogram visualization. - To get the usual view of a histogram, I sort by the (bucketed) distance column in ascending order.
Conclusion
In this article, I’ve given you a glimpse into the power of VisiData, a convenient tool for quick exploratory analysis. While VisiData is far from as powerful as Python or R, it is useful to quickly investigate a data source without much effort.
Do note that there are many functions in VisiData I did not cover, and I encourage you to look further into the documentation for more info. The easiest way to get the hang of it, I believe, is simply trying to do things you want and when you get stuck look up how to do it. That way, you will learn the functionality needed for the tasks you are actually interested in performing.
If you enjoyed this article:
- 👏 Clap, this will help me understand what my readers like and want more of, and commenting is always appreciated!
- 🙏 Follow or subscribe, if you would like to read my upcoming articles.
- 📚 If you are looking for more content, check out my reading lists in AI, Python or Data Science.
Thanks for reading and have a great day.
More from Jacob Ferus and ITNEXT
Recommended from Medium
[
See more recommendations